Volunteer teams & roles
Created on 05 Dec 2025
What are teams?
A team represents a functional area or department at your event. Common examples include:
- Registration – Handling check-in and ticket scanning
- Catering – Food preparation and service
- Security – Crowd management and safety
- Stage crew – Technical support and equipment
- Information – Guest assistance and way finding
Teams can be created at two levels:
- Account-level teams – Available across all your events. Ideal for teams you use repeatedly.
- Event-specific teams – Only available for a single event. Useful for one-off or specialised teams.
What are roles?
Roles are specific positions within a team. They help define what volunteers will actually be doing and their level of responsibility.
Each role has a position type that indicates the level of authority:
| Position type | Description |
|---|---|
| Participant | Standard volunteer position |
| Crew member | Experienced volunteer with additional responsibilities |
| Team lead | Supervises other volunteers within the team |
| Supervisor | Oversees multiple teams or areas |
Example team structure
Registration team:
- Registration assistant (Participant)
- Queue manager (Crew member)
- Registration supervisor (Team lead)
Managing teams
Creating a team
- Click Add team from the dropdown menu
- Enter the team name and optional description
- Choose a colour for visual identification in rosters and reports
- Set the status to Active or Inactive
- If in event context, choose whether the team is for this event only or all events
Editing a team
Click the Edit button (pencil icon) in the actions column to modify team details.
Viewing roles
Click the 👥 button to expand the team row and view all roles within that team. From here, you can:
- Add new roles
- Edit existing roles
- Delete roles
- Reorder roles using drag and drop
Reordering teams
- Click the Reorder button in the table header
- Drag teams to your preferred order
- Click Save to confirm the new order
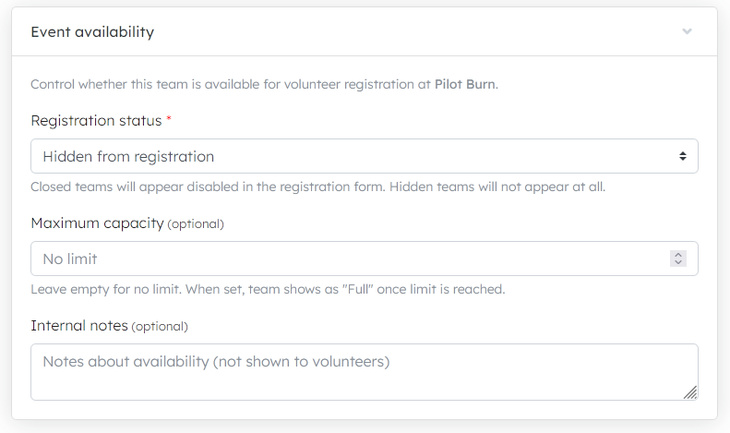
Event availability settings
When viewing teams within an event context, you can control whether each team is available for volunteer registration at that specific event.
Accessing availability settings
- Navigate to Volunteers → Teams within your event
- Click Edit on any team
- Scroll to the Event availability section (only visible for existing teams in event context)
Registration status
Controls whether volunteers can select this team when registering:
- Open for registration – Team appears as a selectable option
- Closed for registration – Team appears disabled with a "Closed" label
- Hidden from registration – Team is hidden from the registration form
Use this to temporarily close teams that have enough volunteers or aren't needed for a particular event.
Maximum capacity
Set a limit on how many volunteers can select this team as their first preference:
- Leave empty for no limit
- Enter a number to cap registrations
When the limit is reached, the team displays as "Full" in the registration form.
- If you set a maximum capacity, that number is used
- If no capacity is set, but shifts exist, the system calculates capacity from total shift requirements
- If no capacity and no shifts, the team has unlimited capacity
Internal notes
Add notes about the team's availability for your reference. These notes are not shown to volunteers – they're only visible to event organisers.
Availability status indicators
In the teams list, the Availability column shows the current status for each team:
| Status | Meaning |
|---|---|
| Available | Team is open and has capacity |
| Full | Team has reached its capacity limit |
| Closed | Team is manually closed for registration |
| No indicator | Account-level team (availability set per event) |
Best practices
- Close teams early if you've received enough applications to avoid over-subscription
- Set capacity limits based on your shift requirements to balance volunteer distribution
- Use internal notes to record why a team is closed (e.g., "Filled from returning volunteers")
- Review availability regularly as your event approaches
Import and export
Exporting teams
Export your teams and roles for backup or to use as a template:
- Click the Export dropdown
- Choose Google Sheets or CSV
Importing teams
Import teams from a CSV file:
- Click Add team → Import CSV
- Upload your CSV file following the template format
- Review and confirm the import
Download the template first to see the required format.
Tips
- Use consistent naming across events for easier reporting
- Assign colours that are visually distinct for better roster readability
- Create account-level teams for roles you use at every event
- Set teams to Inactive rather than deleting them if you might need them again
- Review role position types to ensure team leads have appropriate access levels
Related articles
This guide walks you through the complete workflow of building and managing your volunteer roster
The Volunteer Management System provides a comprehensive solution for organising, managing, and coordinating volunteers for your events.
Here's your 2-minute guide to smarter rostering - when to assign, how volunteers get notified, and why waiting 1-2 weeks before your event saves everyone time. Perfect for team leads!
Learn how to create shift schedules that automatically generate multiple volunteer shifts based on operating hours and shift duration.
Learn how to manage individual volunteer shifts, assign volunteers, and track shift status.